Installation guide: directional brake pads
Directional brake pads are relatively new on the market. Developed by car manufacturers as a way of controlling and reducing brake noise, vibrations and harshness (NVH), directional brake pads use an asymmetrical design so the brake pad touches the brake disc at an angle.
The angle is created with either a chamfer or a crescent cut-out. The result from both methods is a quieter braking system, that performs to the same high standard as a standard brake pad. Read more about directional brakes here:
First of all, what’s the difference between chamfer and crescent cut-out directional brake pads?
Chamfer directional brake pads
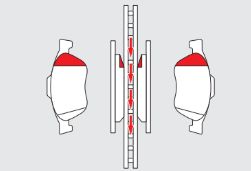
 Chamber directional brake pads use a chamfer, a transitional surface between two sharp edges, on the friction surface. The chamfer prevents the leading edge of the brake pad from lifting from the brake disc, induces even pad wear and reduces noise.
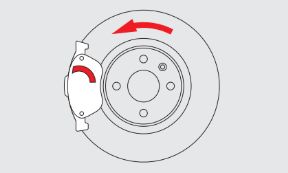
When installing chamfer directional brake pads, follow the directional arrows on the pads. If there aren’t any arrows and there is only one chamfer, install the brake pad so the chamfer is the leading edge where the pad first contacts the brake disc. And if there is a chamfer on both edges, the edge with the larger chamfer area should be installed as the leading edge where the pad first contacts the brake disc.
Crescent cut-out directional brake pads
 Crescent cut-out directional brake pads cut a crescent shape from the reduction shim on the backing plate. A brake shim is a damping unit fixed on the rear of the brake pad. It reduces and dampens vibrations in the brake pad and acts as a thermal barrier, ensuring even temperatures across the pad for more consistent braking. The cut-out allows the piston to push the brake pad at a desired angle, reducing noise and inducing even pad wear.
When installing crescent cut-out directional brake pads, follow the directional arrows on the pads. If there aren’t any arrows, install the brake pad so the crescent cut-out is on the leading edge of the pad, running horizontally across the brake disc. If the pad is fitted in the opposite direction you will experience a lot of high-pitch squealing noise from your brakes.
How to install directional brakes
So, now you’ve noticed a problem with your brakes or you want to upgrade, it’s time to change your brake pads. But do you know what you’ll need and how to do it?
1. Gather everything that you’ll need
Before you start, make sure you have all the tools, replacement parts and materials you need for the job.
This will probably include:
Tools:
- 4-in-1 screwdriver
- C-clamps
- Cordless drill
- Rags
- Socket/ratchet set
- Wire brush
Replacement parts:
- Directional brake pads
- Rotors
- Anti-rattle clips
Materials:
- 1/4 inch vinyl tubing
- Aerosol brake cleaner
- Blue and red thread locker
- Glass jar
- Mechanic’s wire
- Nickel anti-seize
- Polishing pads
- Synthetic high-temperature brake grease
- Spray rust penetrant
2. Remove the wheel
It’s always a good idea to work on one side at a time. This gives you a clear reference of the exact positions of all the clips, springs and other components.
The first task is to loosen the lug nuts while the tyre is on the ground. Then raise one side of the car, using a jack stand under the engine for additional safety. Remove the wheel completely.
3. Unbolt and remove the calliper
Loosen the calliper retaining bolts and the calliper bleeder screw. Lightly reseat the calliper bleeder screw.
Lift the calliper off the rotor and place it on top of the calliper bracket.
4. Retract the piston
Connect one end of the drain tube to the bleeder screw and place the other end in a glass jar. Open the bleeder and force the calliper piston back into the bore so that liquid can come out. When it’s done, tighten the bleeder and disconnect the drain tube. Secure the calliper to the coil spring or strut using mechanic’s wire so it doesn’t dangle while you are working on the brake.
Remove the calliper bracket, noting if the calliper bracket bolts were coated with red or blue thread locker as you’ll need to recoat the threads with the same type when you reinstall them.
5. Remove the rotor
Remove the rotor hold-down screw. This is often a difficult task, so soak it first in spray rust penetrant for at least 15 minutes before trying to remove it. When the screw has been removed, pull the rotor off the hub.
6. Cleaning is important
Improper cleaning or installation procedures are directly responsible for common brake complaints, including noise and vibrations. Proper cleaning and installation means:
- Cleaning all the rust off the calliper bracket;
- Using aerosol brake cleaner on the calliper bolts and checking for corrosion (replace if corroded);
- Replacing the anti-rattle clips and any other worn brake components;
- Greasing bolts and installing new rubber boots;
- Removing all rust and debris from the wheel hub, using a polishing pad on your drill makes this job easier;
- Cleaning the new rotors and spray with aerosol brake cleaner as a preventative measure. Washing in hot soapy water with a stiff brush and fully drying is recommended.
7. Reassemble
It’s time to reassemble your brake. Slide the rotor onto the hub, align the rotor retention screw hole with the threaded hole in the hub. Tighten the screw (see your owners’ manual for specs), apply the correct thread locker to the calliper bracket bolts and reinstall the calliper bracket.
Apply a thin layer of brake grease to the back of the noise reduction shims, slide them into place – see details above about chamfer and crescent cut-out brake pads – and install the springs. Reinstall the calliper.
8. Final tasks
To finish the installation, lower the car until the tyre just touches the ground. Set your torque wrench to half of the specified torque (see your owners’ manual) and tighten the lug nuts in a star format. Set the wrench to the full torque and tighten the lug nuts in the same star formation. Lower your car and remove the jack.
Now repeat with the other brake on the same axle. It is recommended to always replace the brake pads for wheels on the same axle at the same time.
Testing is also important. With the engine off, press the brake pedal several times until it feels firm. Then go for a test drive – at slow speeds – to ensure the brake pads work. Finally, check your owners’ manual to see if there are any specific ways for your car make and model to break in new brake pads.
Ferodo directional brake pads
For more information about installing directional brake pads, download the Ferodo
The content contained in this article is for entertainment and informational purposes only and should not be used in lieu of seeking professional advice from a certified technician or mechanic. We encourage you to consult with a certified technician or mechanic if you have specific questions or concerns relating to any of the topics covered herein. Under no circumstances will we be liable for any loss or damage caused by your reliance on any content.