FRONT BRAKES
Ventilated disc brake, with floating caliper and control cylinder.
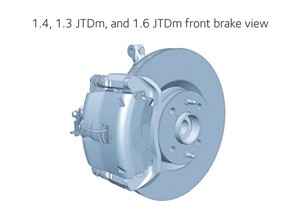
BRAKE PADS
Brake pads: REMOVAL
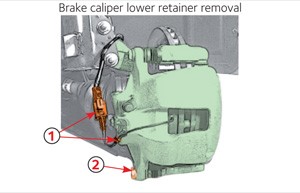
- Position vehicle onto lift.
- Remove front wheels. (Note: Brake pad wear sensor is fitted on left front brake caliper, only.)
- Disconnect electrical connector (1) from brake pad wear sensor, and release wiring from middle retaining clip.
- Loosen lower retaining screw (2) between front brake caliper and bracket.
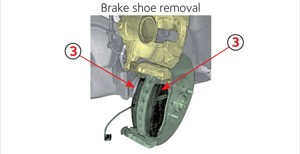
- Turn front brake caliper, and secure it in place.
- Eliminate any glue residues present under side tabs, and caliper piston.
- Remove front brake pads (3) from bracket.
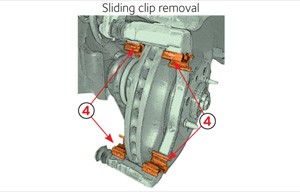
- Remove sliding clips (4) from brake caliper bracket.
WARNING: When retracting the piston into the caliper housing, brake fluid is pushed into the reservoir. When retracting the caliper, ensure that caliper piston is supported. Make sure that brake pad contact points are clean and free from any contamination. Ventilated disc brake, with floating caliper and control cylinder.
BRAKE PADS: ASSEMBLY
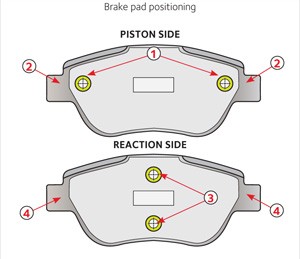
- Clean caliper bracket before fitting pad sliding clips.
- Position the sliding clips inside bracket seats.
- Place front brake pads inside their seats, taking care to correctly position pad on vehicle piston side. This pad is identified with the rivets (1) parallel to locking tabs (2).
- Place front brake pads inside their seats, taking care to correctly position pad on vehicle reaction side identifi ed with the rivets (3) at right angles with locking tabs (4).
- Remove any double-sided film protection from brake pad back side.
- Position front brake caliper inside its seat, and tighten a newscrew to a torque of 27 ÷ 30 Nm.
- Connect brake pad wear sensor electrical connector, and secure wiring in place with middle retaining clip.
Brake discs: REMOVAL
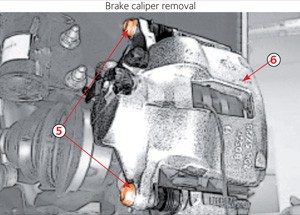
- Position vehicle onto lift.
- Remove front wheels.
Note:
Brake pad wear sensor is fitted on left front brake caliper, only.
- Disconnect electrical connector from brake pad wear sensor, and release wiring from middle retaining clip
- Loosen screws (5), and remove front brake caliper (6).
- Loosen mount retaining screws, and remove front brake caliper.
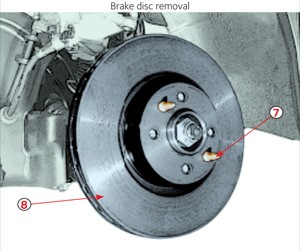
- Loosen screws (7), and remove front brake disc (8).
brake discs: ASSEMBLY
- Reposition front brake disc into its seat, and tighten screws to a torque of 10 ÷ 15 Nm.
- Put front brake caliper into its seat, and tighten screws following the correct sequence (start with a torque of 15 Nm, and then tighten to a torque of 27 ÷ 30 Nm starting from the upper screw).
- Connect brake pad wear sensor electrical connector, and secure the corresponding wiring in place.
OPERATIONAL PRECAUTIONS
Brake fluid is hygroscopic, and it should be changed at regular intervals. Do not use fluid which does not comply with the specifi cations indicated in the table. Take care not to let fluid accidentally drop onto painted, rubber, plastic and mechanical parts.
PARKING BRAKE
Hand brake mechanical control consists of a lever (1), positioned between the two front seats, operating a rocker arm with two flexible link bars (2) connected with parking brake levers on rear brakes.
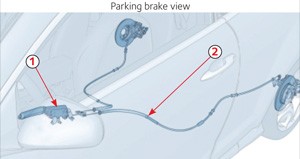
ADJUSTMENT
Note: Parking brake should be adjusted after having replaced rear brake pads or the complete cable, as wear clearance is automatically closed up.
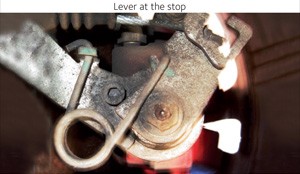
- First check before cable is adjusted that the lever that comes from the caliper is at the stop.
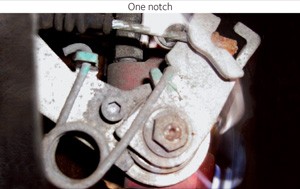
- Apply one notch to the park brake and check that the lever has moved away from the stops and the gap is the same on both calipers.
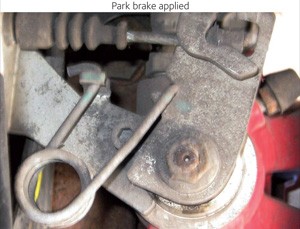
Note:
The caliper lever must always be at the stops before the piston is wound back when new pads are fitted.
If not the park brake will not function correctly.
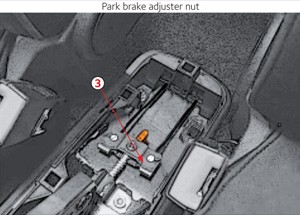
- Mark adjuster nut (3) position, then loosen it at least by 2 or 3 turns so as to ensure complete loosening of the cable.
- Start engine, and operate brake pedal vigourously at least 10 times.
- Pull hand brake lever up to the fi fth click of the toothed section.
- Tighten adjuster nut onto hand brake lever until rear wheels are braked.
- Make sure that, with the hand brake lever in rest position, rear wheels are free to turn.
- Switch engine off.
HYDRAULIC CIRCUIT
FILLING AND BLEEDING
- Position vehicle onto lift.
- Make sure that brake-clutch fluid level is between MIN and MAX marks.
- Remove brake-clutch fluid reservoir cap, and connect a suitable tool to the reservoir.
To prevent any impurities from entering the brake-clutch fluid reservoir, before loosening cap thoroughly clean both cap and the whole reservoir surface around it.
- Remove protective cap.
- Connect the recovery device, and open bleeder valve onto brake caliper.
To ensure complete bleeding of the braking system the bleeder opera ting overpressure should be set to 1.0 bar.
- Slowly open bleeder cock, and wait for all air inside the hydraulic system to be evacuated.
- All brake bleeding needs to be conducted in a set order, starting with the brake caliper furthest from the master cylinder.
- Once the bleeding operations have been completed, carry out a road test where at least one instance of ABS braking occurs.
| BRAKE FLUID | |
| Product: | DOT4 SAE J1703 |
| Capacity: | 1.0 litre |
| Maintenance intervals: |
Replacement and bleeding every 2 years |
| BRAKE FLUID DOT4 | ||
| FBX050 | 500ml | 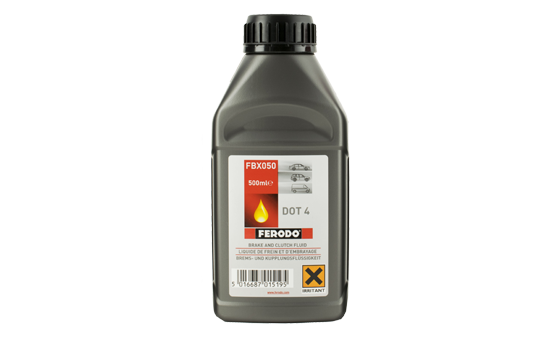 |
| FBX100 | 1 lt | |
| FBX500 | 5 lt | |
| FBX2000 | 20 lt | |
| FERODO PART NOS. |
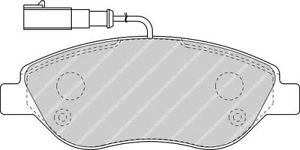
| Brake Pads | FDB1468 |
 |
|
| Bosch Brake Caliper | |
| Brake Pads | FDB1468 |
| Length (mm) | 151.0 |
| Height (mm) | 57.3 |
| Thickness (mm)* | 18.4 |
| Min. thickness (mm)* | 8.0 |
| Brake Discs | DDF762 |
| Type | Ventilated |
| Diameter (mm) | 257.0 |
| Thickness (mm) | 22.0 |
| Min. thickness (mm) | 20.2 |
* Support included