Identify your noise type
Automotive brake noise has always been a concern among demanding drivers worldwide. With the rise of nearly completely silent combustion, electrical and hybrid vehicles, sonic standards are higher than ever before as common brake pad sounds become more apparent. Whether your brake pads need replacing depends on the type of sound you are experiencing.
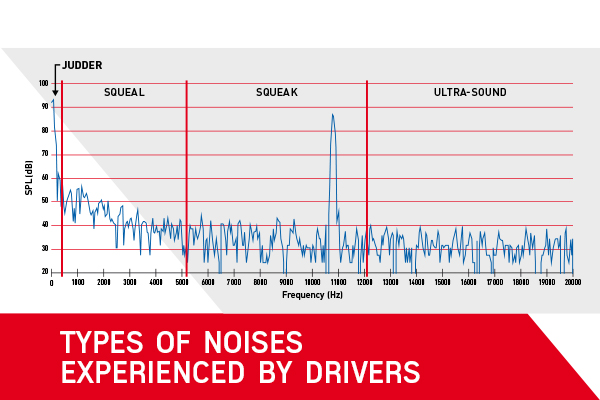
If it's a low frequency vibration or judder, this often originates from macro-vibrations of a brake system component like the brake disc. A medium squeal with a frequency of between 300 to 5.000 Hz means you’re probably experiencing micro-vibrations in the caliper piston or in another part of the vehicle corner. In this article however, we’re going in-depth on the high-pitched noise professionals call a squeak.
Squeaky braking
sounds 101
A squeak is a brake noise with a higher frequency than 5 kHz. There are several possible origins of squeaking noises, but the main one is probably a molecular vibration within the friction materials during application to the brake disc. Modern brakes use a cast-iron disc squeezed between two brake pads lined with friction material. Under certain conditions in which the disc, pads and caliper are mounted they can start to vibrate in exactly the same way a violin’s string vibrates when stroked by the horsehairs on the bow. Are these so called high frequency vibrations dangerous for daily driving? No. They do however form a serious automotive annoyance among car-lovers worldwide.
A perfect mating area between the pad and the disc surface does not just happen when you fit new pads. Correctly bedding in any brake pad and disc before use is the best way to avoid any unwanted sounds during braking. This bedding in process can be started in the workshop, but should also be continued by the end-user, the driver himself. Let’s start with a few bedding in tips for the installer.
What to do in the workshop
By carrying out different stops (usually about 20 to 30 from 30 to 0 mph), the pad and disc begin a burnishing process before the customer collects their car. It is important that during the first 10 stops, the temperature does not exceed 200°C. Between the tenth and the twentieth stop, temperature limits rise to 300°C. And from 20 stops onwards, an installer needs to ensure the temperature stays below 350°C to correctly bed in all braking parts. Especially when you have newly coated brake discs.
Why it's important to avoid overheating? If brake pads overheat when new, their underlying structure can change permanently because of the materials they are made of. So until the brakes are fully bedded in, drivers should avoid heavy braking, as this intensive process leads to soaring temperatures. This includes high speed braking, towing heavy loads or driving on a steep terrain.
How to explain bedding-in to the driver
For the drivers themselves, you should recommend braking gently, and frequently for up to the first 200 miles, every time the brake pads make contact with the discs. Each stop increases the contact surface area between the two. This directly leads to better braking in the long-term. So remind your customers to brake lightly, and frequently after the pads have been fitted.
correct brake pad
and caliper fitment
Prevention is always better than cure and the easiest way to avoid any braking noise problems like judder, squeal or squeak, is to ensure that both the brake pad and the caliper are correctly fitted right from the start. We’ve listed some handy tips below that will instruct you on how to perform a successful brake assembly.
By following these tips, you will be able to avoid any unwanted vibration noises, and allow drivers a smooth and comfortable ride. Important note: be sure to always perform a road test before returning the vehicle. This ensures that your brake system is in full working order. Always be sure to advise on correct bedding-in procedures to ensure proper brake efficiency, as explained above.
1. Strip and clean all the caliper slides and pins
2. Only use emery paper on the caliper and pad abutments in case of heavy rust or pollutants. Note: if the caliper is not sliding easily, this can result in tapered pads or uneven wear within axle. This creates a squeal or judder.
3. Keep in mind that the pins must have the correct lubrication to ensure free movement. Also, the pin cannot seize into the caliper body. Check the condition of the slide pin rubber boots to stop water ingress. Note: if the pins are not lubricated, they may seize. This causes taper wear and noise issues.
4. Look out for free piston movement and retract the piston fully. This is essential to avoid damage to the shim or rubber coat.
5. Make sure that your brake pads fit easily into the caliper brackets.
6. Clear burrs of the brake pad edges if necessary. Note: if the pad is not moving freely inside brackets, there will be ongoing light contact with the discs, causing squealing as well as tapered pads or uneven wear.
7. In specific cases, it is recommended to lightly lubricate the contact points between the back metal plate and the slides with synthetic grease. Just be sure to avoid copper grease. Note: ensure no grease touches the friction material.
8. Insert wear indicators in or on the brake pads. Screw in the caliper fixing bolts and replace the thread-lock bolts with new ones.
9. Follow the correct tightening torque and sequence recommendations. With the brake caliper reassembled, pump the brake pedal until the stroke is around one third of the full stroke potential. Check if the brake is operating correctly, including pad retraction. Refit road wheel and check for free rotation. If there is free rotation, the vehicle is ready to go back on the road.
The content contained in this article is for entertainment, informational and promotional purposes only and should not be used in lieu of seeking professional advice from a certified technician or mechanic. We encourage you to consult with a certified technician or mechanic if you have specific questions or concerns relating to any of the topics covered herein. Under no circumstances will we be liable for any loss or damage caused by your reliance on any content.